Tooth Fairy Finger Puppet and Tooth Castle Craft-Fine Motor Fridays

We are back for Fine Motor Fridays with a funny little craft inspired by a question my 3 1/2 year old daughter asked me. She saw a cartoon episode about loose teeth where they talked about the Tooth Fairy but the show didn't give a lot of information for someone who is new to the Tooth Fairy idea.
“Where does the Tooth Fairy live?” was the first thing she asked. I honestly didn't know how to answer, I didn't remember where she was supposed to live. I actually posted the question on my facebook page and got a lot more responses than I expected!! The consensus seemed to involve a tooth castle.
My daughter seemed really excited by this whole idea, despite being far from loose-tooth age. I tried to think of a craft or activity we could do involving the Tooth Fairy and I thought it would be fun to make a tooth castle somehow.
The ideas we came up with had a mix of fine motor skills movements: cutting, bubble wrap stamping, finger-print painting and flying the finger puppet.
I think these easy finger puppets would be a really fun and easy craft to do at a Butterfly Birthday Party or Fairy Birthday Party. We had a grade school friend over one day and she had just as much fun decorating her wings as my 3 1/2 year old. In fact she inspired a new use for the finger puppet, which I'll share at the end!
Here is how we made our easy Tooth Fairy finger puppets and how you can too!
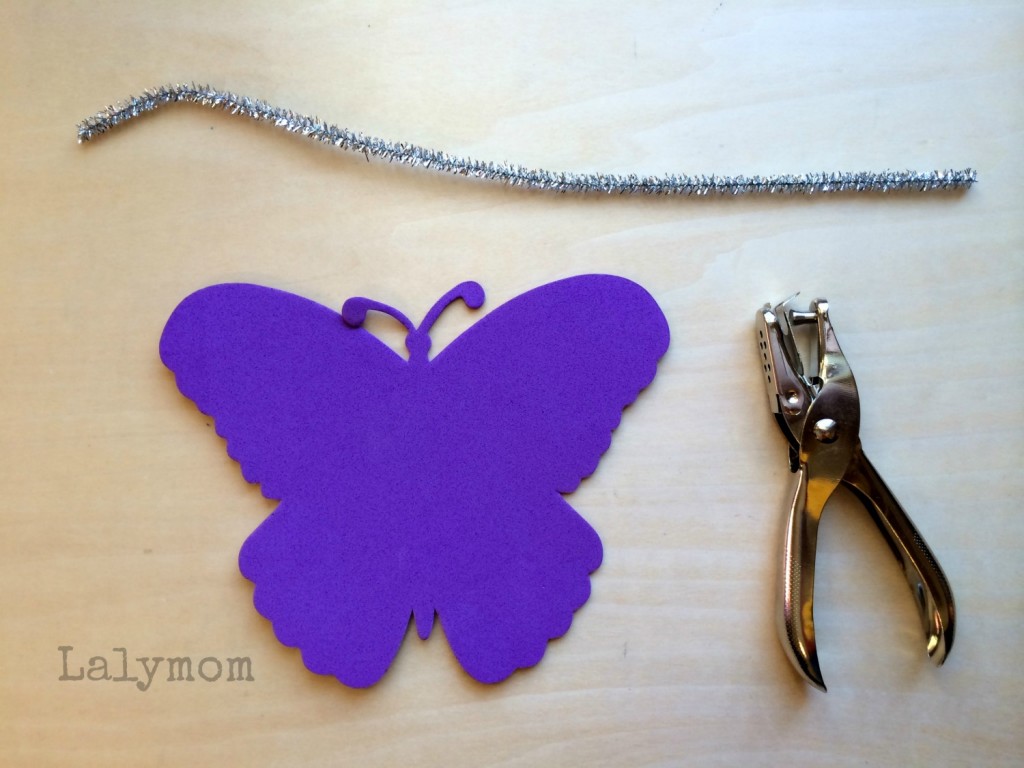
Easy Tooth Fairy or Butterfly Finger Puppet Materials
Craft Foam cut to wing shapes (I used pre-cut butterfly shapes)
Fuzzy Stick (AKA Pipe Cleaner)
Single hole punch
Markers or Paint (depending on desired decoration)
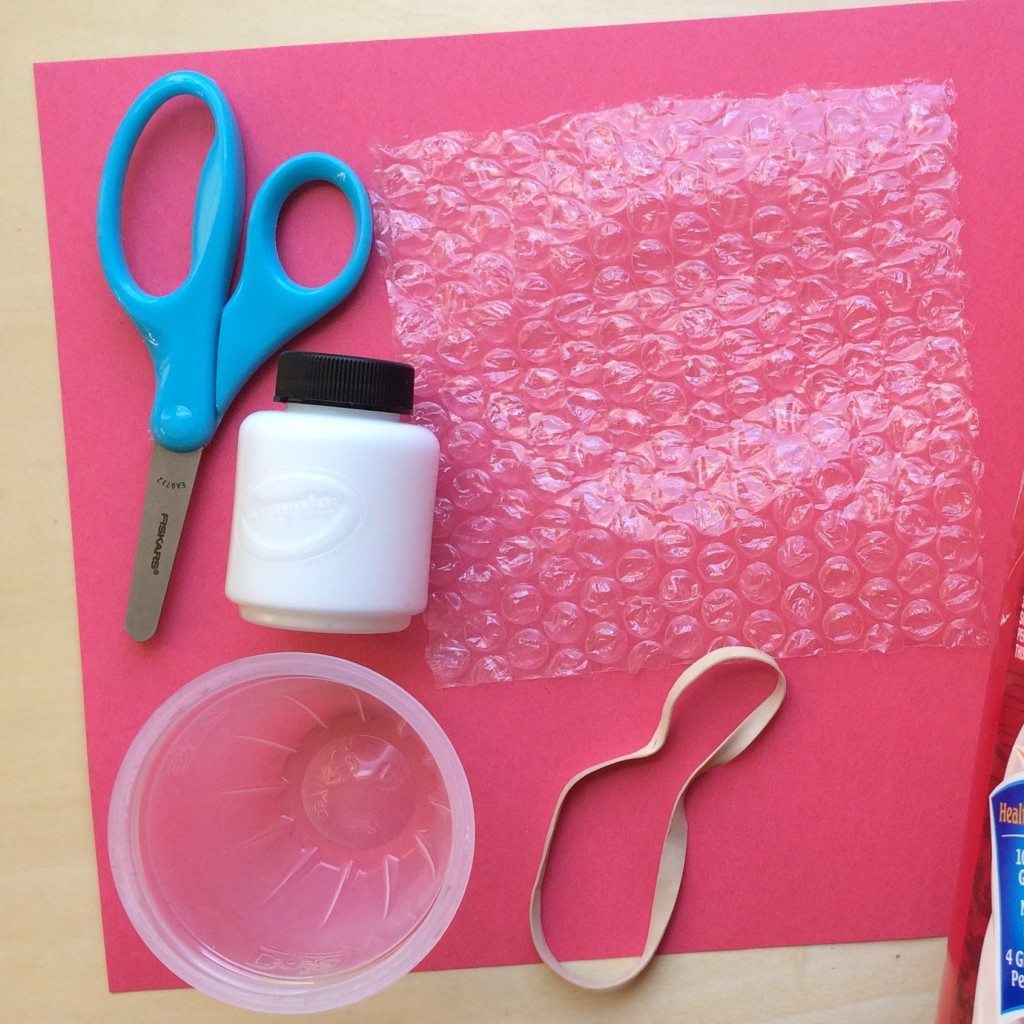
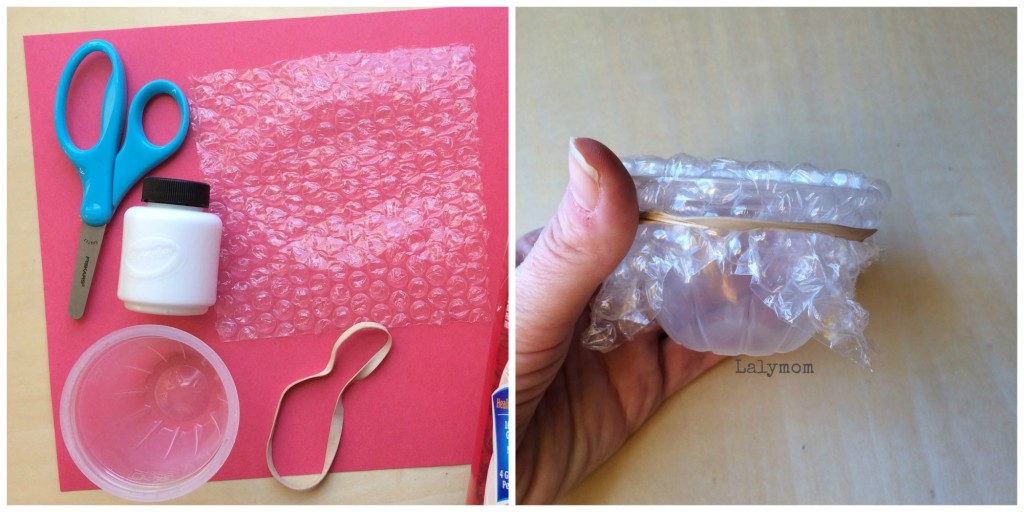
Optional Supplies for Tooth Fairy Paint Stamping:
Bubble wrap
Plastic container or toilet paper roll
Rubber Band
White Paint
Easy Tooth Fairy or Butterfly Finger Puppet Instructions
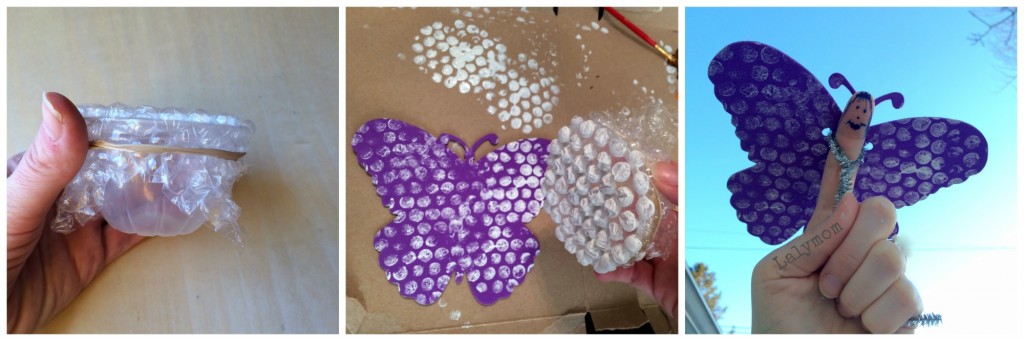
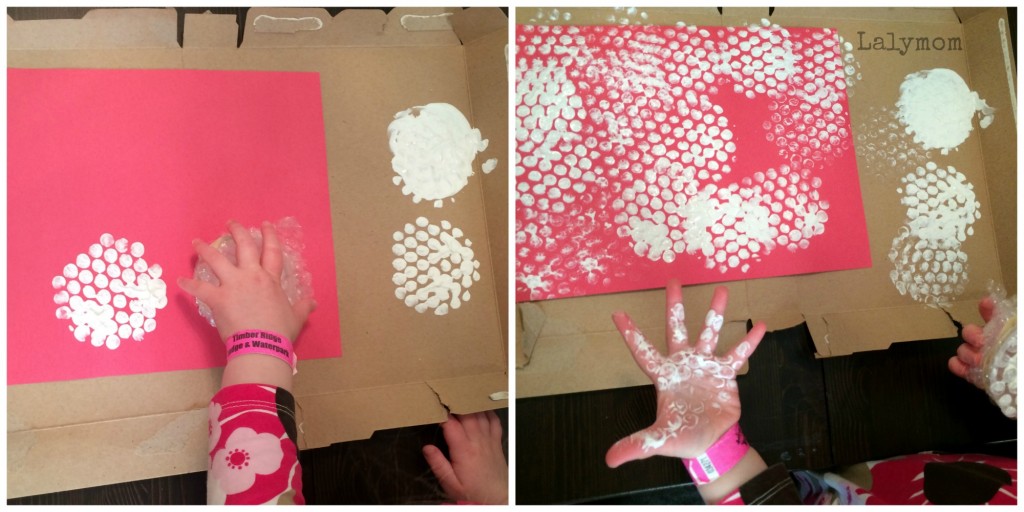
Prepare the Wings! Cut your craft foam into a set of wings if you are not using pre-cut shapes. Your child can use markers, paint, jewels, stickers or whatever you have on hand to decorate. If you specifically want to make a Tooth Fairy Finger Puppet, with a Tooth Pattern on her wings here is how we did it. Cut a piece of bubble wrap large enough to overlap one end of your plastic container or toilet paper roll. Hold the bubble wrap taut over the end and rubber band it into place. Press the bubble wrap stamper into white paint and try it once on scrap paper to get off excess paint. Stamp onto one side (or both sides if you want to try not to mess up the other side!!) of the wings. Let dry.
Make it a Finger Puppet! Using the single hole punch, punch two holes about a 1/2 inch apart, near the top center of the wings. Cut your fuzzy stick in half (use wire cutters rather than scissors if you can) and poke the ends through the holes. Wrap the ends around your child's index finger. Using a marker or a pen, draw a face on the index finger.
Fly! Your Finger Puppet is complete- she is ready to fly around and collect her teeth now!
We also made a Tooth Castle for our Tooth Fairy to live in and that added in some more Fine Motor Skills with a fun craft! We switched up the base of the castle from an oatmeal cylinder to a cereal box, but either would work.
If you want to make this little playset for your new fairies, here is how we did it!
Tooth Fairy Castle Materials
Construction Paper
White Paint
Bubble Wrap
Small plastic container or toilet paper roll
Rubber Band
Empty Oats cylinder container or cereal box
Scissors
Glue Stick
Tooth Fairy Castle Instructions
Stamp the Teeth- If you haven't already made the bubble wrap stamper above, cut a piece of bubble wrap large enough to overlap one end of your plastic container or toilet paper roll. Hold the bubble wrap taut over the end and rubber band it into place. Press the bubble wrap stamper into white paint and try it once on scrap paper to get off excess paint. Stamp onto one side of your construction paper (we used red paper, thinking of the inside of your mouth). Let dry.
 Cut the Castle Bricks- Draw some rectangles onto the top of the construction paper and ask your child to cut them out to make the shape of the castle at the top.
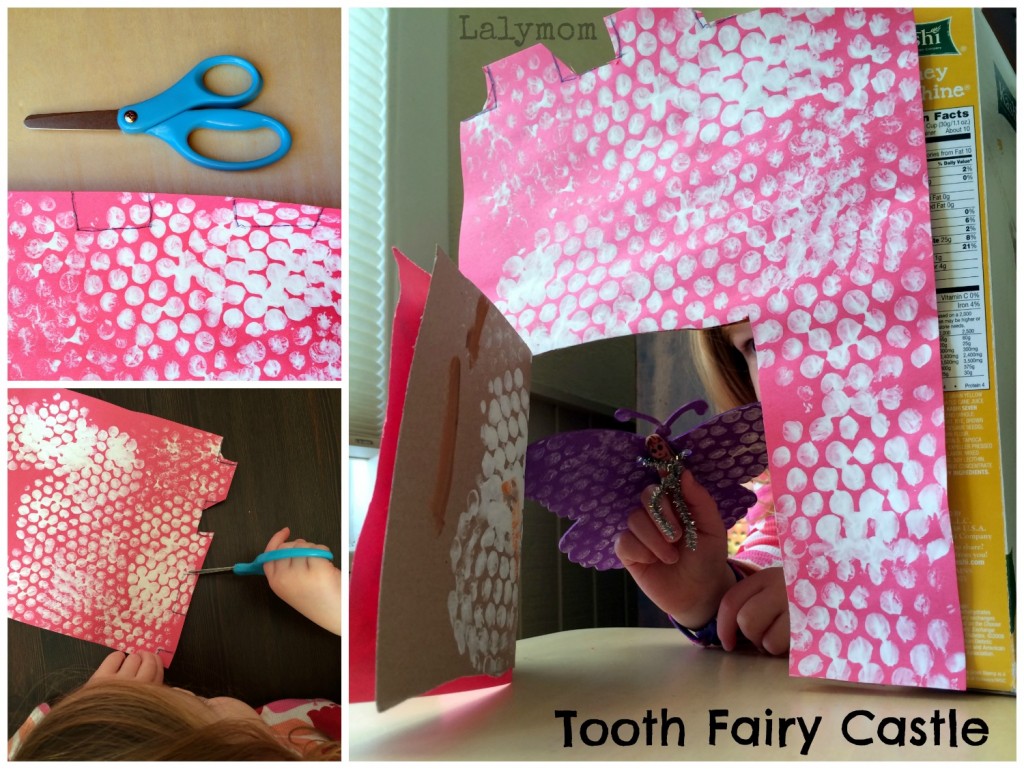 Create the Castle- Take your cereal box and separate the cardboard along the seam to make it flat. Trim the bottom flap off one large side. Using glue stick, glue the construction paper onto the same large side of the cereal box. Next make an inverted L shape cut to make a door, cutting through the cardboard and construction paper at the same time. Stand it up and if desired tape or glue the bottom flaps of the side and back of the cereal box to help it stand. (If you are using an Oat canister, you can turn it upside down and glue or tape the paper onto that, then cut the door by cutting through the paper and canister at the same time.)
Hooray! Now your Tooth Fairy has her very own Tooth Castle!
Bonus: Easy Barbie Fairy Wings
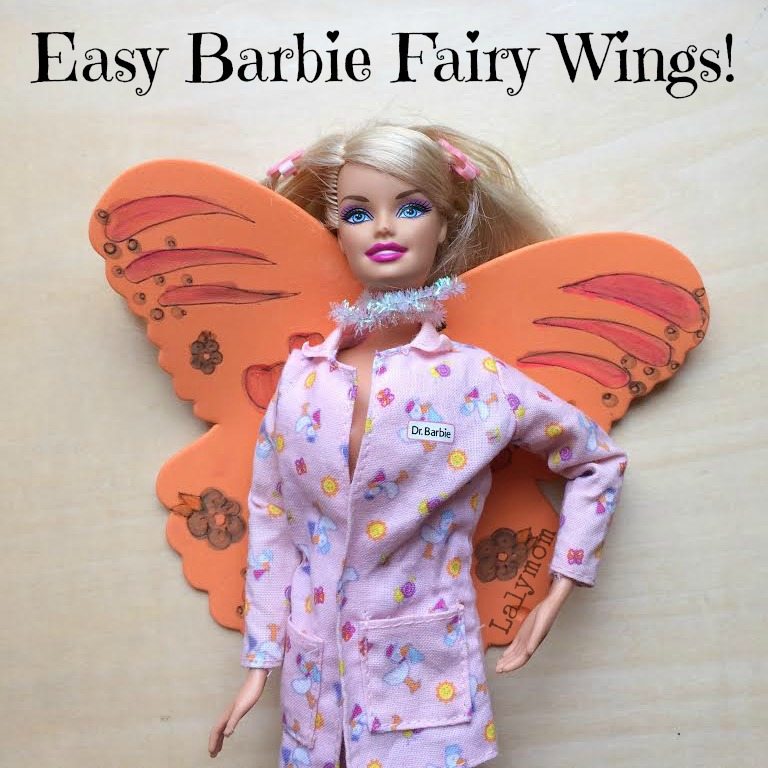
Our neighbor's daughter comes over to play with the kids every so often and she happened to be over when we had our fairy finger puppets out. She also brought some Barbie dolls so she and my daughter could play with them. We had the grand idea to make her Barbie dolls into Fairies! Cut your craft foam wings if needed, decorate the craft foam any way you like, punch two holes and wrap a pipe cleaner through the holes and around Barbie's neck! Ta-Da! Instant Barbie Fairy Wings!
Fine Motor Fridays
Another Friday brings another awesome list of playful Fine Motor Skills Activities from the FMF Bloggers! Please click through to see all the fun ideas and be sure to follow our Fine Motor Fridays Pinterest Board.
Gingerbread People from P is for Preschooler
Play Dough Search & Find Playmobil Activity from Little Bins for Little Hands
Copying Patterns with Building Blocks from Craftulate
Dot Sticker Spelling Scramble from School Time Snippets
Frozen Inspired Winter Writing Salt Tray from Still Playing School
Fine Motor Shaving Cream Heart Dig from House of Burke
Montessori Toddler Colour Activities from Racheous – Lovable Learning
Pincer Fine Motor Skill Practice from Powerful Mothering

Thanks for reading my post today! If you enjoy trying simple, playful activities with your baby or toddler, I invite you to check out a lovely collaborative eBook that I contributed to. Zero to Two ~ the book of play is chock full of easy activities, step-by-step tutorials and inspiring photographs from some of the top kids bloggers from around the world! There is an index that helps you select the perfect activity based on your child's stage in life and many of the activities are perfect for multiple siblings of different ages to do together! Learn more here!


Oh it’s so cute! I love the finger puppet especially!
I love the tooth fairy finger puppet! I never thought of where the tooth fairy lived, but I suppose a tooth castle makes as much sense as anything! 🙂
These are SO cute! And I love how you used bubble wrap stamping for teeth.
adorable!
Such a sweet idea, my little girl would love this!
Love how you made the bubble wrap stamp! Such a fun little craft; I think my daughter would love butterfly wings for some of her dolls!
That is way too cute! Thanks for sharing.
Lovely idea. I’ve featured it this week on The Sunday Showcase: http://www.herecomethegirlsblog.com/2014/02/09/activities-for-3-5-year-olds.html
Great use of bubble wrap for printing a beautiful pattern on butterfly and tooth fairy castle.