Back to School Countdown Craft


With a three year old getting ready to start preschool, I wanted a fun, easy back to school countdown craft to help us build up some excitement. We did a store bought advent calendar at Christmas time but 25 days of wanting to open all the remaining doors on the advent calendar was a bit much. The under side of an egg carton has 5 gaps though, and 5 days seemed just right. FYI A couple affiliate links are included in this post.
RELATED: Back to School Celebration Pack
DIY Back to School Countdown Calendar Materials
-1 large sheet of yellow craft foam
-1 sheet of black craft foam (any size)
–Tacky Glue (I've read that Elmer's will fall off craft foam so we used Aleene's Original “Tacky” Glue. You could also try hot glue, just don't know if it would melt the egg carton)
–Number stickers (1-5)
-Empty, clean egg carton (mine measured about
-Sharp pointed knife
-Black pen or marker
Back to School Countdown Calendar Tutorial:
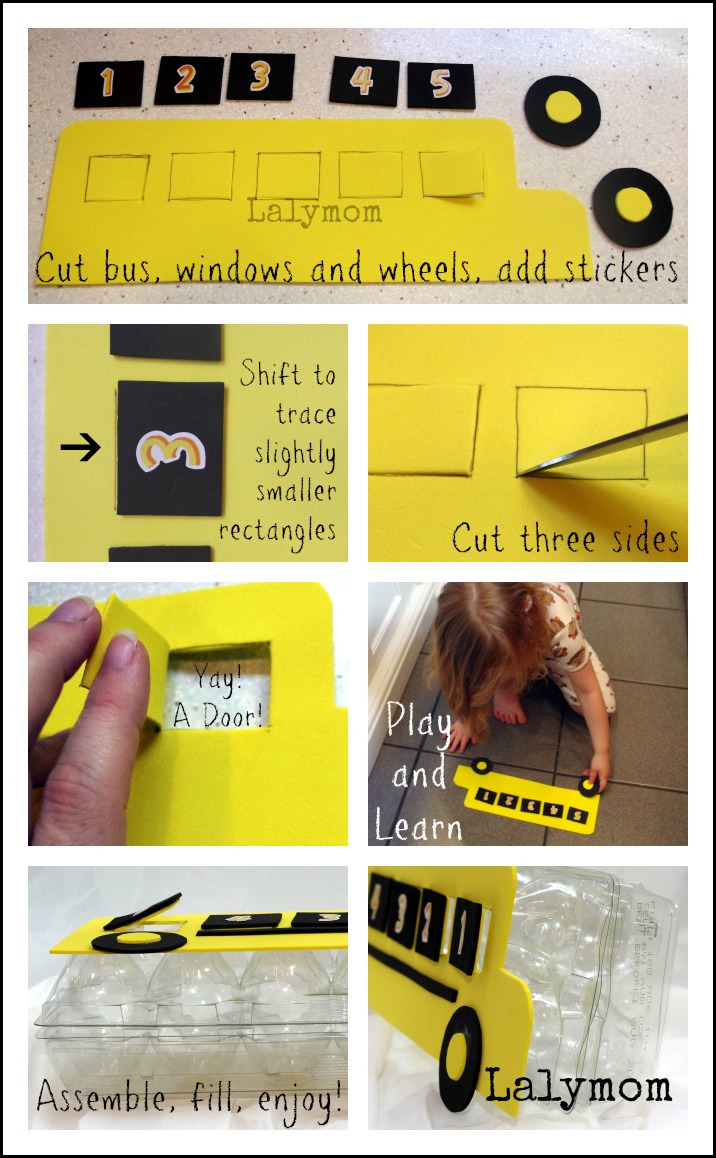
To start, cut a piece of craft foam to about 12 X 4 inches, then cut out a 1.5 inch square in one top corner and round the top corners of the bus. Cut two circles from the yellow foam, each with a 3/4 inch diameter. (I was hoping to use my craft punches for the circles but the foam was too thick.)
Cut out 5 rectangles from the black foam, about 1 inch by 1.5 inches. Cut 2 circles from the black foam with a 1 3/4 inch diameter. Cut a stripe if desired, mine is 6 inches long.
Add stickers numbered 1-5 to the rectangles. Glue small yellow circles in the center of the larger black circles.
Lay your egg carton bottom side up and put the bus on it to see where your gaps fit. My bus fit best with the same amount left over on the top and bottom, and the same on each side (not counting the extra chuck where the engine would be). I arranged the rectangles over the gaps and for mine this meant they were 3/4 inch from the top and the first and last ones were about 5/8 inch from the sides. This left roughly a 1/4 inch gap between the rectangles.
Trace each rectangle- actually I moved each one slightly before tracing each side so that the resulting rectangle was slightly smaller than the black rectangle. Using the sharp tipped knife, cut through the top, bottom and right sides of each of the drawn rectangles, resulting in 5 side-opening doors. (You could also do top opening or bottom opening if you want.)
We Interrupt the Previously Scheduled Crafting for Some Important Learning!
At this point in the process Ladybug was pretty interested so I gave her the bus, windows and wheels. This was where the learning snuck in! She went right to work matching the black rectangles onto the bus to make windows and although I hadn't marked the place for the wheels, she had an easy enough time putting them in the right spot.
Then she noticed the numbers and decided to start over, putting them in the right order. Once she was done I asked what if we put the numbers backwards, like a countdown? She knows the phrase 3, 2, 1, blastoff, so I just added the 5 and the 4 and said, “You know, 5, 4, 3, 2, 1, blast off!” She got it right the first time after I said that.
Once we had everything in the right place, but not yet glued down, I moved us to her workspace at the table and we resumed assembling it.
We Now Return You to the Crafting Process!
Glue the bus body to the egg carton, putting tacky glue along the top edges of the top eggs and the bottom of the bottom ones (this will ensure that you don't glue any of the doors shut). Next you or your child should glue the black rectangles in place, making sure the glue stays in the center of the yellow door.
Once dry, tip the egg carton so that it rests on the edge of the lid. This will tip the bus up a little, leaving a gap for the wheels to hang off the bottom. Glue the circles in place where they will be able to rest on the table and then lay the egg carton back down so they dry.

What to Fill Your Back to School Countdown With
It's up to you! You could add small school supplies, like erasers. Stickers or tattoos would work as well as small party favor type toys (bouncy balls, plastic rings). What I did was to print out small coloring pages from Coloring Crew to fold up and put in each one. I chose pictures to represent fun things to do each day: picnic, zoo, haircut, dinner (at a restaurant) and I haven't picked the last one yet! It might be a picture of her grandma, who we might go visit, or the children's museum.
Well that is one was we are going to kick off the school year, what do you think!? I also have a big list of 1st Day of School Traditions that I put together while I was trying to decide what to do for Ladybug.
I also invite you to check my Back to School Pinterest Board for photo ideas, food fun, crafts and more!
We'd love to see you again soon! Please follow along on our facebook page so you don't miss any of the fun! See you next time!

That’s adorable! 🙂 My BTS kids are older, but the whole craft made me smile.
Thanks for the kind comment! Always happy to inspire a smile!
Adorable!!!
Thanks Diana!
This looks great – such great upcycling, too! Although I’m slightly concerned that you wrote “fun” and “haircut” in the same sentence; you really should come with us when F next goes! 😉 Also interesting to note that I use the same glue – it has taken me MUCH trial and error to find this one!
Thanks for the nice comment! Ha, I have only taken Ladybug once and she surely doesn’t remember! But the place I took her has rocket ship barber chairs, dvd players and goldfish crackers…I don’t think she even noticed the lady with the scissors! And I had to google it to find out what glue to use, glue stick was an instant fail and I was worried the hot glue would melt the egg carton! 🙂
Great idea to use an empty egg carton for the back of an advent calendar! You could do this for so many things like countdown to trips or birthdays or holidays.
My favourite part is that you made the rewards activities that you can do together!
Thanks for linking up to Tender Moments with Toddlers & Preschoolers!
Thanks for the opportunity to share! And thanks for the kind comment, yes I am hoping to do more of these!
This is adorable! And you snuck in some learning, you sneaky thing. I like that glue for a lot of things, too- it’s not too watery and it’s nice and strong.
Haha, thanks for the nice and funny comment. I know, I can’t just do a craft, HAVE to get in that learnin’! 😉 This was my first time with that glue and I can see how it is a crafter’s best friend!
What a lovely idea and what an exciting time. I do hope all goes well starting school. Thank you so much for linking to the pin it party. I have pinned and shared 🙂
Thanks for the kind words and for sharing! It is a great linkup, thanks for the opportunity to share!
This is a very cute idea
Thanks for linking up for Mummy Mondays.
Thanks for the kind comment and for the opportunity to share!
That’s a great way to use things you already have for something new and exciting!
Aww thanks, what a nice compliment, yes my daughter has also been playing with it as a school bus- bonus! 🙂
Thank you for linking this to the Back to School link up! I have shared it on Google+.
Thanks so much for sharing, that’s so nice of you!
This is so awesome! Thanks for linking to Discover and Explore- I will be sharing on G+ and FB this week!
Thanks for the kind words and for sharing! I really enjoy the themes at Discover and Explore it’s a great place to go when you want all kinds of great ideas on the same theme. Hope I continue to have posts to share in the themes, so great!
This is such an awesome idea!! LOVE how you tied learning into it as well! Off to pin and share! Thanks so much for linking up the Discover & Explore linky!
Thanks Chelsey, what a nice comment and thank you for sharing! I’ve been really enjoying the Discover and Explore linkup, great themes and good to know where to go for lots of themed ideas all in one place!
Cute idea!
Thanks so much Cynthia!
I’m featuring this adorable calendar at Discover and Explore this week. Thanks so much for linking up!
Very cute!! Thank you for sharing on Sharing Saturday!!
So lovely idea, greeeting from Belgium
Very cute but I need to correct you. “Advent” is the church season leading up to Christmas. An Advent calendar is one that counts down the days of advent. Advent is not a type of calendar. The term should be reserved for describing the church season.
Thank you for taking the time to correct me, I saw someone just said that on Pinterest as well. Funny I was raised Catholic, and I know about Advent but since I was a kid, I ALSO thought of it as a way to describe calendars with doors that open! HA! I hope to have time to change the title and image soon, but there are a lot of pins out there with that word already on it so I am sorry for my error! Thank you again for your time!