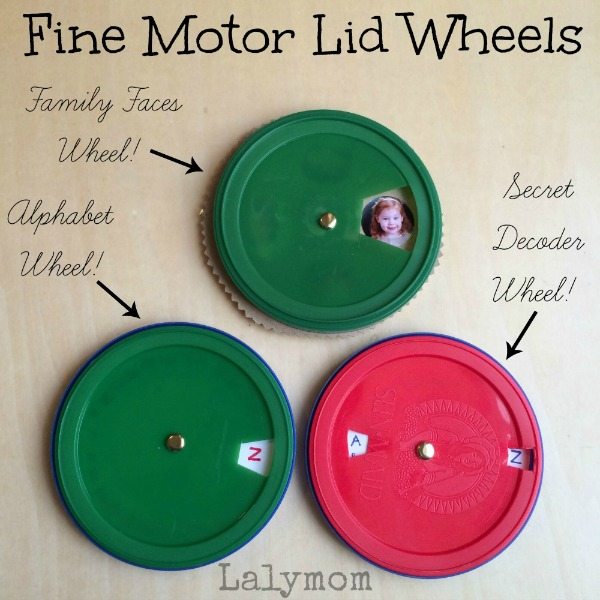
Fine Motor Skills Wheels & Volvelle Tutorial- Fine Motor Fridays
Welcome to a new year of Fine Motor Fridays! I'm back with our group of lovely bloggers to bring you more fine motor skills activities! I love making DIY Toys from recycled materials and this is one of my favorites!
This week I finally made a toy for my son that has been on my mind for months. Ever since he received the cool book Dig In! ![]() by April Jones Prince, I knew I wanted to make him a turning paper wheel- otherwise known as a volvelle. Every page in this book has moving paper part and my 15 month old son's favorite part is turning the cement truck paper wheel.
by April Jones Prince, I knew I wanted to make him a turning paper wheel- otherwise known as a volvelle. Every page in this book has moving paper part and my 15 month old son's favorite part is turning the cement truck paper wheel.
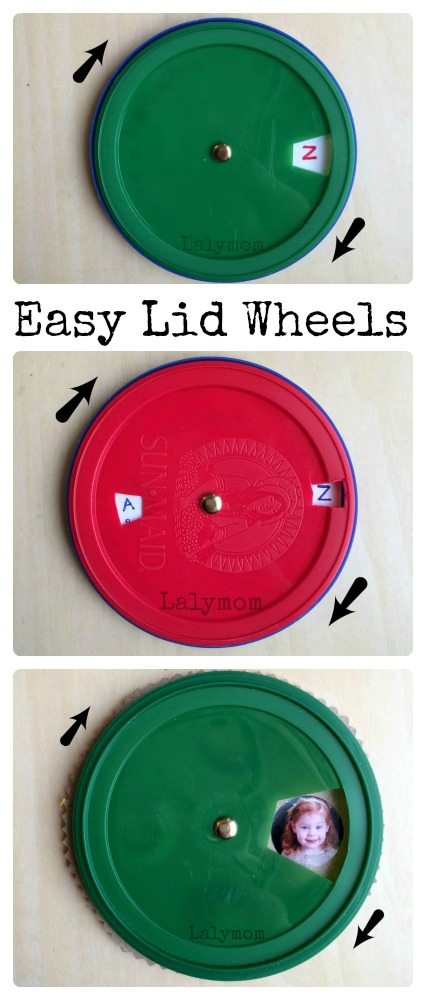
I'd looked up tutorials for a paper volvelle before but then something clicked this week as I noticed two lids in our recycle pile were nested together juuuust right. And poof the fine motor wheels were born! I got a little excited and made three different kinds! The materials and basic idea for each one is the same though. Note: Be sure to supervise young children with this or any toy using a metal brad. If it is removed it could be a choking hazard. My children play with these while I am with them!

Fine Motor Skills Volvelle Materials:
affiliate links are included in this post for your convenience…
Plastic lids that nest (mine are from raisins, prunes, and Gerber Graduates Lil' Crunchies![]() ) or just one for the front
) or just one for the front
Cardstock or thin cardboard
Metal Brad
Pens/Family Photos
Exacto knife or box cutter
Scissors
Tape
Pinking Shears![]() (optional)
(optional)
Easy Fine Motor Skills Volvelle Tutorial:
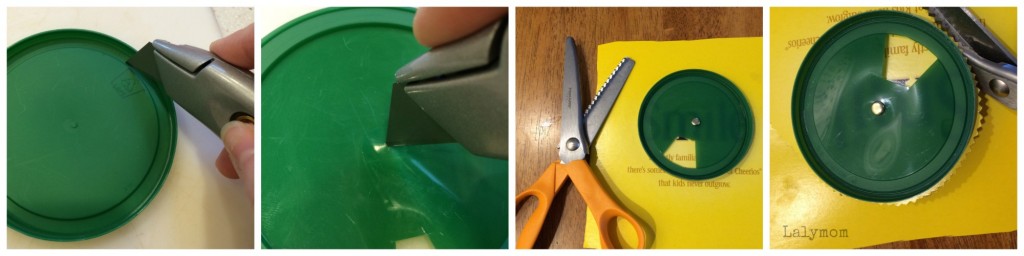
1. Prepare the front. Lay the lid face down on a cutting board or safe cutting surface. Using an exacto knife or box cutter, carefully cut the window(s) where you want the paper to show through. Next place the tip of the knife at the very center of the lid, there should be a small bump there to show you where the center is. Slowly rotate the lid while holding the knife in place, slowly carving a hole at the center. Next place the brad through the hole and twist it a few times to be sure that it turns well.
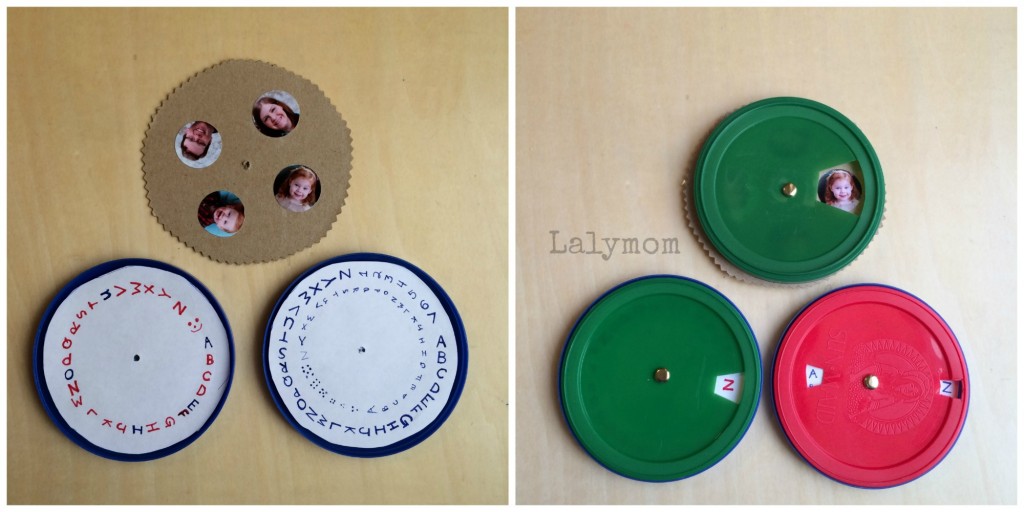
2. Prepare the inside. If you are using another lid for the back, like in the alphabet wheel, trace your newly-prepared front lid on some cardstock, paper or thin cardboard. Cut your inside paper about a millimeter inside that traced circle so it fits inside the front lid. If you are making one like the family faces wheel, where the paper sticks out, poke a hole in the paper/cardstock where you want the center to be, attach the lid to the center with the brad, then using pinking shears or textured scissors to trim the circle about a centimeter outside of the edge of the lid.
3. Assemble. If using two nesting lids, place your inside layer into your back lid and center it. I added a small loop of scotch tape to keep it in place. You could glue it but using tape allows you to remove the inside layer if you want to make more than one. Place the front lid on and fasten the layers with the brad. If you are not using the back lid, just fasten the paper layer to the front lid with the brad.
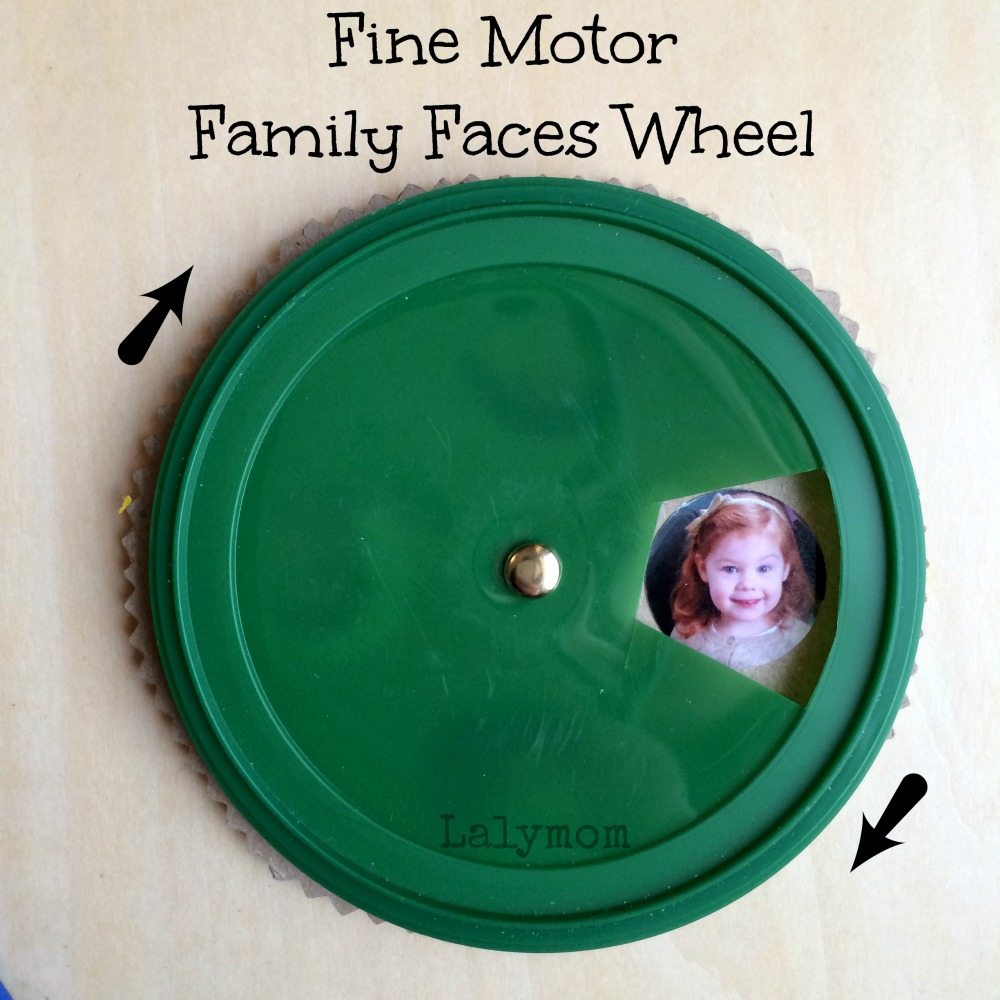
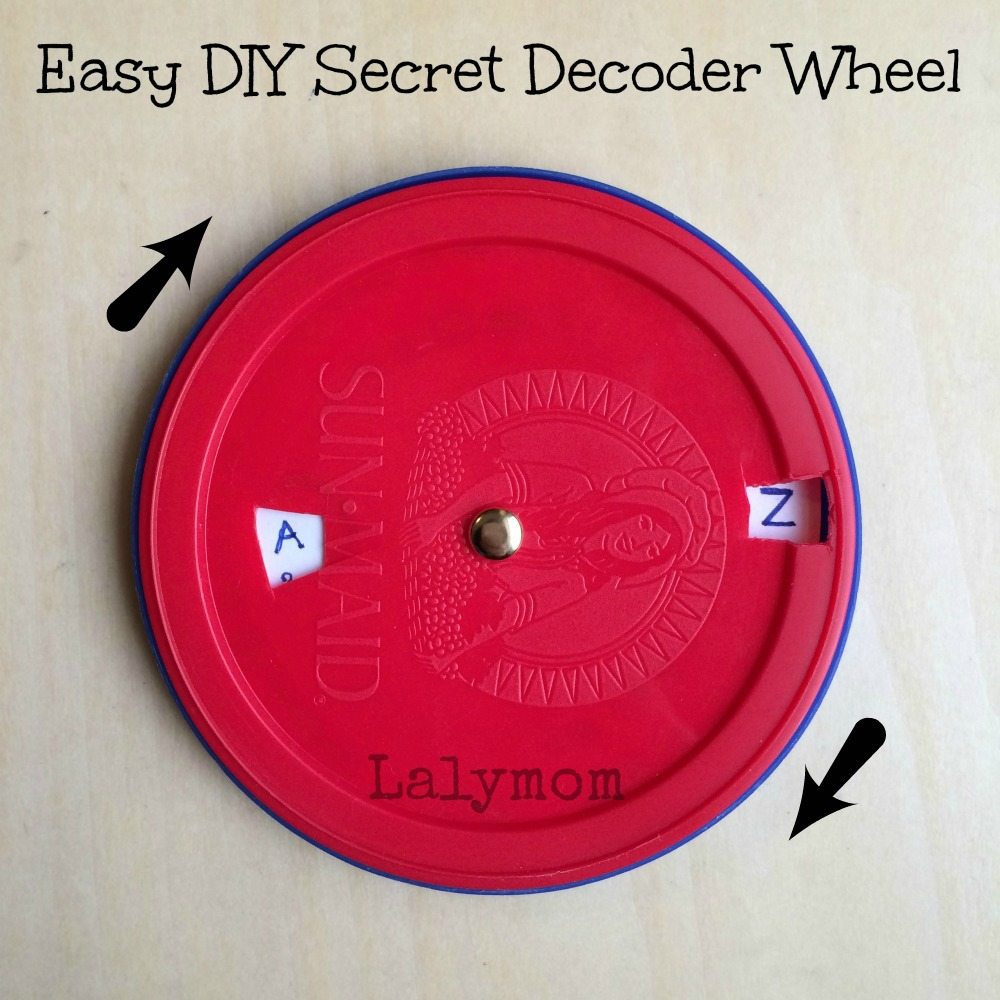
4. Add letters or photos. I found it easiest to add the letters with the volvelle assembled. I started with A, the slid the front lid down until the A was JUST covered, then I wrote the B, turned it again and so on. For the secret decoder, I added one outer ring of letters first, then matched up the A with the Z, B with the Y, etc, I wrote the second inner ring of letters second. For the family faces volvelle I marked a dot where I wanted each face, then took the brad out and glued the photos in place. Once the glue was dry I reassembled it.
Ta-da! You just made a volvelle! How cool! These are great for little fingers to spin, dial and twist! The peek-a-boo aspect of the family faces wheel has been fun for my kids. My 3 year old daughter likes to spin it from face to face, each time asking her little brother who it is. And I'm happy that I made a quick, easy recycled toy that gives both my kids a fun way to work on Fine Motor Skills!
My daughter can read her name and knows all of her letters and sounds, but the decoder one is a BIT advanced for her. I started to explain it to her and noticed she was not very interested. We will try again another time. I would, however, have cut the inner window (the left on in the picture) a bit shorter, since you can see the surrounding letters a bit through ours
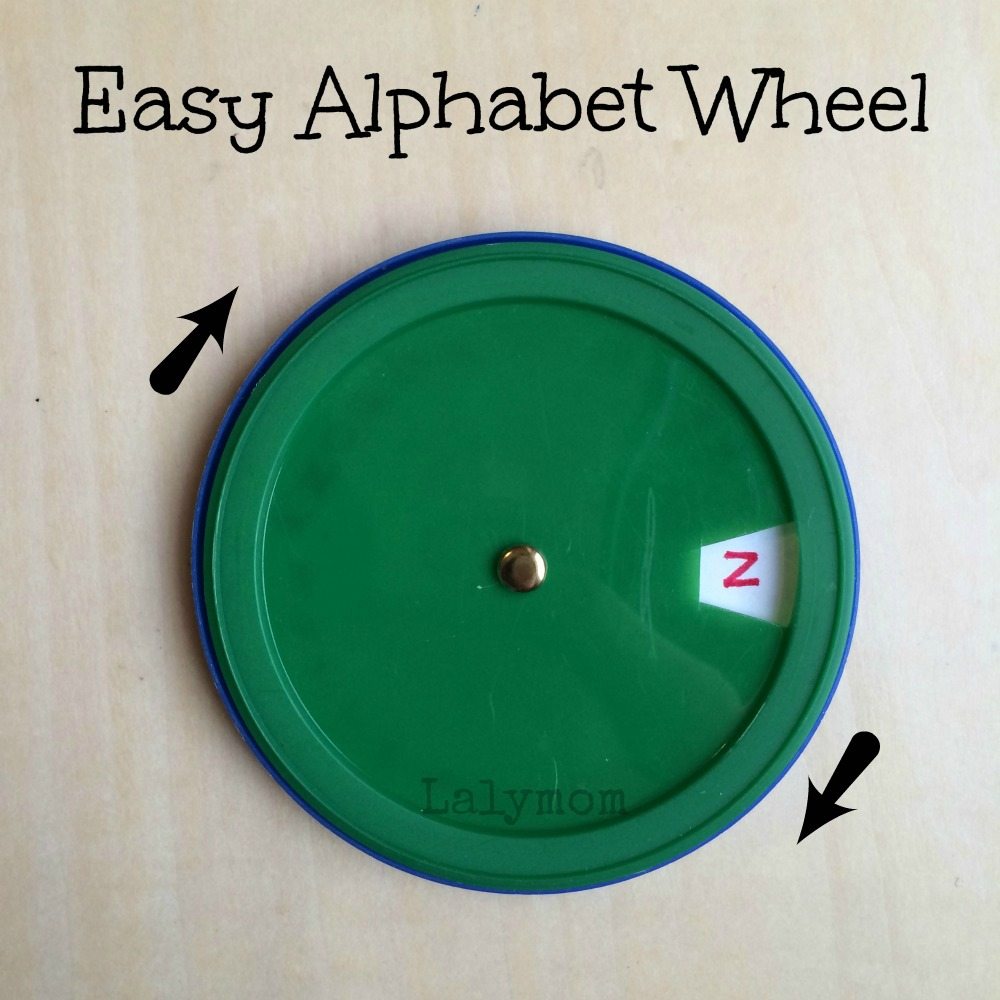
She did like turning the regular alphabet one and saying the letters and sounds. On ours I decided to make the letters colored like a Montessori Movable Alphabet![]() . You could make yours whatever color you like or even use small stickers or stamps.
. You could make yours whatever color you like or even use small stickers or stamps.
The kids have had a lot of fun twisting and turning these, but the favorite is the family faces one. I like it because of the pinked edges and the kids love seeing each of our faces!

Check out more ideas for DIY Toys from Fine Motor Fridays and more here:
Pin it here:

Fine Motor Fridays
We are back with most of the usual suspects this week! Be sure to click through to see what Fine Motor Skills Activities they have come up with this week!
Hot Chocolate Party from Still Playing School
Pre-Writing Practice from Craftulate
Confetti Fine Motor Skills Sensory Search from Little Bins for Little Hands
Build a Snowman from Stir the Wonder

Thanks for reading my post today! If you enjoy trying simple, playful activities with your baby or toddler, I invite you to check out a lovely collaborative eBook that I contributed to. Zero to Two ~ the book of play is chock full of easy activities, step-by-step tutorials and inspiring photographs from some of the top kids bloggers from around the world! There is an index that helps you select the perfect activity based on your child's stage in life and many of the activities are perfect for multiple siblings of different ages to do together! Learn more here!


oh these are really cute! Great idea! I bet my son would have fun with these too!
Genius idea! What a fun, versatile tool!
These turned out great! The family faces one is my favorite!
Very fun! What a great recycled fine motor skill idea! You are always so creative!
What a great creative idea!I love it.
Such a fun idea!! I’m excited to surprise my boys with one. I’m such a big fan of your creative activities. Thanks for sharing with all of us!
awesome…..thanks for sharing….my boys will love it
Neat Idea! I tweeted it. 🙂
What a fun and creative NEW idea. I love it. I think I’ll try these with my kindergarteners site words! 🙂 Thanks for the idea.
What a fun learning tool!
Thanks for sharing with After School!
I saw this on G+, such a lovely idea.
Oh my goodness – I love this idea! So simple and I think my kids will love it. The decoder will be perfect for my kids to play spy!
What a great idea! I especially like the photo one…that would be so fun.
Thanks for the great decoder wheel. My son loved playing with it this afternoon. https://www.facebook.com/photo.php?fbid=400987430045046&set=a.400987353378387.1073741875.341125256031264&type=3&theater
These are an excellent idea. Thank you!!
Liz’s Early Learning Spot.